One person per seat, never lent out
Use your account on your own devices only; do not share it and do not pass credentials on. Signing in concurrently from several places is the single most typical trigger for account controls.


The complete walkthrough · from sign-up to daily use
Sign up and verify your email first, then buy a plan and learn to read the order status. Once the order says it is done, set up your residential egress, run the self-check, and open Claude from the console.
The whole journey
Confirming the payment (支付结果确认中): this is the message you land on coming back from checkout, not an order status. Wait for the page to refresh itself and do not order again; if nothing changes for a long time, refresh manually under Purchases & orders (购买与订单).
Awaiting payment (待支付): we have not confirmed the money yet. You can hit continue to return to checkout, or cancel the order. Even if you have just paid, refresh and wait for the payment result to sync rather than creating a second order.
Paid · activating (已支付 · 开通中): payment is confirmed and activation is running automatically. Wait for the status to move on.
Done (已完成): your dedicated usage environment and your residential egress are ready. Open My subscription (我的订阅) for the delivery details, then carry on with the network setup below.
Out of stock · restocking (缺货补发中): payment is confirmed and your order is queued for restock. You can keep waiting, or ask for a full refund the way the order page describes.
Refund under review / refunded (退款审批中 / 已退款): under review means waiting for us to process it; once it says refunded the refund has been issued, and when the money lands is up to your original payment provider.
Cancelled (已取消): the order will not activate by itself any more. If you find out after cancelling that the payment did go through, nothing is refunded or activated automatically — an administrator will check it by hand and then either refund you or activate it. Wait for that outcome before buying again.
The console and the screenshots on this page are in Chinese: that is what the current build ships, and the screenshots were taken on a Chinese Clash Verge Rev. Every interface item below is therefore written as English name (中文 label), and the Chinese in brackets is always the wording that is actually on screen. For Clash Verge Rev the English name is the one its own English interface uses, so you can switch the client to English and still follow along. The console has no English interface yet, so there the English name is our translation for reading only — go by the Chinese in brackets. One set of Chinese words stays Chinese in both languages on purpose: the three names inside the Clash script (Claude家宽, ccrelay-家宽出口, 中间节点). Those are identifiers rather than labels — step 3b explains why they must be copied exactly.
Second half · network setup after delivery
Step 01 · Account basics
ccrelay binds every Claude account to a residential egress of its own. Your side of the deal is to make sure that everything this machine sends to Claude leaves through the residential egress assigned to you — and that it does so every time.
Use your account on your own devices only; do not share it and do not pass credentials on. Signing in concurrently from several places is the single most typical trigger for account controls.
Always reach Claude from the same residential egress. An egress that keeps moving — broadband today, a datacentre tomorrow, another city the day after — is far riskier than one steady residential IP.
Do not let the browser go out through the residential egress while the command line connects directly. Set it up the way this guide describes (rule-based routing + TUN) so that everything reaching Claude leaves from the same egress — not half and half.
New machine or old, run the clean-up script in step 02 once: it removes only the old signed-in state, caches and config it actually detects on this machine, and does nothing at all when there is nothing to find. That keeps traces of an older account out of your new environment.
No scripted high-frequency requests, no heavy concurrency in a short window. The closer your usage looks to an ordinary person at work, the safer it is; if something looks off, stop and contact your administrator.
The upstream service weighs where you sign in from, what your egress IP belongs to and how the account behaves. Keeping one residential egress, not hopping between networks and not mixing environments keeps that pattern steady and predictable — which is simply what running your own network environment properly looks like: one ordinary residential line, used the ordinary way. The steadier the pattern, the lower the risk of account controls.
Step 02 · Clean up
Everyone does this step once. The script removes an old account's signed-in state, cache or config that is already on this machine so that the old and the new environment cannot collide. It solves exactly that one thing: it cannot lower or work around the upstream platform's risk controls, and it changes nothing about the usage rules or the compliance boundaries.
Everyone runs it once: the script detects this machine's old signed-in state, cookies, Claude Code / desktop-app caches and config, and lists what it actually found before it does anything. A brand-new machine turns up nothing, so nothing is cleared.
If there is local data you want to keep: read the destructive-action note below first, then either answer the prompt accordingly or go straight for the --keep-data (-KeepData on Windows) command, which clears only sign-in credentials and device traces.
The script clears the sign-in credentials, sessions and config of Claude Code and the desktop app on this machine, resetting them to a fresh signed-out state. It does not uninstall anything and does not touch system machine identifiers. By default it first moves your .claude data (chat history, skills, configuration) as a whole into a claude-backup-<timestamp> folder in your home directory, which you can restore at any time and delete by hand once you are sure you no longer need it; desktop-app caches and site data hold no user content and are deleted outright. To keep chat history, skills and other local data, answer the prompt accordingly or add --keep-data (-KeepData on Windows), which clears only sign-in credentials and device traces; --no-backup is the one that deletes for good — no recycle bin, no undo. Before it acts, the script lists what it is about to clear and asks you to confirm once (-y skips the question and clears everything by default).
# Default: backs up to claude-backup-<timestamp>, lists what it will clear, waits for ycurl -fsSL https://ccrelay.ai/__funclaude/home/assets/cleanup.sh | bash# Keeps chat history / skills and other local data, clears only sign-in and device traces:curl -fsSL https://ccrelay.ai/__funclaude/home/assets/cleanup.sh | bash -s -- --keep-data# Default (PowerShell): backs up, lists what it will clear and asks you to confirmirm https://ccrelay.ai/__funclaude/home/assets/cleanup.ps1 | iex# Keeps chat history / skills and other local data, clears only sign-in and device traces:& ([scriptblock]::Create((irm https://ccrelay.ai/__funclaude/home/assets/cleanup.ps1))) -KeepData# Adding -Yes skips the confirmation and clears everything; not recommended if this is new to youQuit Claude and run the script: by default it moves your .claude data into a restorable claude-backup-<timestamp> folder in your home directory, then lists what it actually detected, and only acts once you answer y. To keep chat history and skills, answer the prompt accordingly or add --keep-data.
It clears the old account's sign-in credentials, session history and caches, and the device identifiers and telemetry IDs the apps generated. The programs themselves and the desktop app's VM data stay; system machine identifiers are left alone.
Only when the browser really does hold an old account's state does it clear claude.ai cookies and site data; a fresh browser needs nothing. When the script asks about your global git email you can leave it blank to skip.
Cleaning up solves exactly one thing: a conflict with an old signed-in state, cache or config on this machine. It does not lower or work around the upstream platform's risk controls, and the rules still apply afterwards — one person per seat, a fixed egress, ordinary use.
Step 03 · Chained proxy
Use Clash Verge Rev (mihomo core) so that traffic to Claude passes through your own upstream node first and then leaves from our residential exit, with rule-based routing and a TUN virtual adapter so the browser, git and the Claude CLI all take the same residential egress. The routing is whitelist-shaped: domestic traffic and anything already named in your own subscription keeps following your own rules, while anything not named goes out through the residential line by default — nothing leaks. The upstream hop is a node from your own node subscription; what we supply is the residential exit.
① The Clash Verge Rev client (installed in 3a below). ② An upstream node of your own — a node subscription you bring yourself; we supply the residential exit, the upstream hop is yours. ③ Your residential connection details from the console: My subscription → Residential (我的订阅 → 家宽) → View connection details (查看连接信息), which is also where the one-click script lives.
.dmg (aarch64 for Apple Silicon, x64 for Intel), drag it into Applications and open it.x64-setup.exe, install it and launch it.select group pinned to one residential node — never a url-test / fallback group that switches on its own. The 「Claude家宽」 group built into the one-click script is exactly such a select group.ccrelay-家宽出口 (the residential exit node), 中间节点 (the group holding your own upstream nodes) and Claude家宽 (the group the rules point at) — are identifiers, not labels. The console's one-click script generates the very same three, and the script's parts refer to each other by those names. Renaming or translating any of them raises no error; traffic simply stops taking the residential line. Keep them exactly as printed — and for the same reason the comments inside the script stay in Chinese: it is the console's script verbatim, and comments have no effect on what Clash does.The easy way: use the one-click script. In the console, under My subscription → Residential → View connection details (我的订阅 → 家宽 → 查看连接信息), copy the Clash Verge script that already has your egress filled in and paste it into Global Extend Script (全局扩展脚本) — nothing to write by hand. How it works: dialer-proxy is set on the residential exit node and points at the 「中间节点」 group; that group uses include-all to pull in every node from your own subscription and exclude-filter to leave the residential node itself out (so it cannot chain to itself), which is why you never have to name your own nodes. It is a url-test group as well, so it picks a working node for you and you do not even have to choose. If you do write it by hand, note that a group itself cannot carry dialer-proxy: to put one upstream hop in front of a whole subscription, use proxy-providers.override.dialer-proxy.
// ===== Claude 家宽出口 · Clash Verge Rev 全局扩展脚本 =====// 替换下方 5 个连接占位值后,整段粘贴到「订阅 → 全局扩展脚本」并保存const HOME_NODE = { name: "ccrelay-家宽出口", type: "socks5", // 按实际协议填写 socks5 或 http server: "home.example.com", port: 1080, username: "your-username", password: "your-password", udp: true, "dialer-proxy": "中间节点",};// 自动纳入你自己的节点订阅,排除家宽自身以防自链const FRONT_GROUP = { name: "中间节点", type: "url-test", "include-all": true, "exclude-filter": "(?i)ccrelay", url: "https://www.gstatic.com/generate_204", interval: 300, tolerance: 50, lazy: true,};const CLAUDE_GROUP = { name: "Claude家宽", type: "select", proxies: [HOME_NODE.name] };// 前插规则:anthropic / claude 关键词(官方新增域名自动覆盖)、// 登录人机验证与出口自检走家宽,压过你订阅里可能存在的 AI 分组规则const CLAUDE_RULES = [ "DOMAIN-KEYWORD,anthropic,Claude家宽", "DOMAIN-KEYWORD,claude,Claude家宽", "DOMAIN,challenges.cloudflare.com,Claude家宽", "DOMAIN-SUFFIX,ipinfo.io,Claude家宽", "DOMAIN-SUFFIX,ifconfig.me,Claude家宽",];// 直连保险:你订阅缺国内/局域网直连规则(黑名单式订阅)时兜住,避免误进家宽const DIRECT_SAFETY_RULES = [ "DOMAIN-SUFFIX,local,DIRECT", "IP-CIDR,127.0.0.0/8,DIRECT,no-resolve", "IP-CIDR,10.0.0.0/8,DIRECT,no-resolve", "IP-CIDR,172.16.0.0/12,DIRECT,no-resolve", "IP-CIDR,192.168.0.0/16,DIRECT,no-resolve", "IP-CIDR,100.64.0.0/10,DIRECT,no-resolve", "IP-CIDR6,::1/128,DIRECT,no-resolve", "IP-CIDR6,fe80::/10,DIRECT,no-resolve", "DOMAIN-SUFFIX,cn,DIRECT", "GEOIP,CN,DIRECT",];function main(config, profileName) { // 家宽节点放列表最前,代理页里一眼可见 config.proxies = [HOME_NODE].concat(config.proxies || []); config["proxy-groups"] = [FRONT_GROUP, CLAUDE_GROUP].concat(config["proxy-groups"] || []); // 白名单化:剔除原订阅的 MATCH 兜底,未列名流量默认进家宽 const ownRules = (config.rules || []).filter(function (rule) { return String(rule).indexOf("MATCH,") !== 0; }); config.rules = CLAUDE_RULES.concat(ownRules, DIRECT_SAFETY_RULES, ["MATCH,Claude家宽"]); return config;}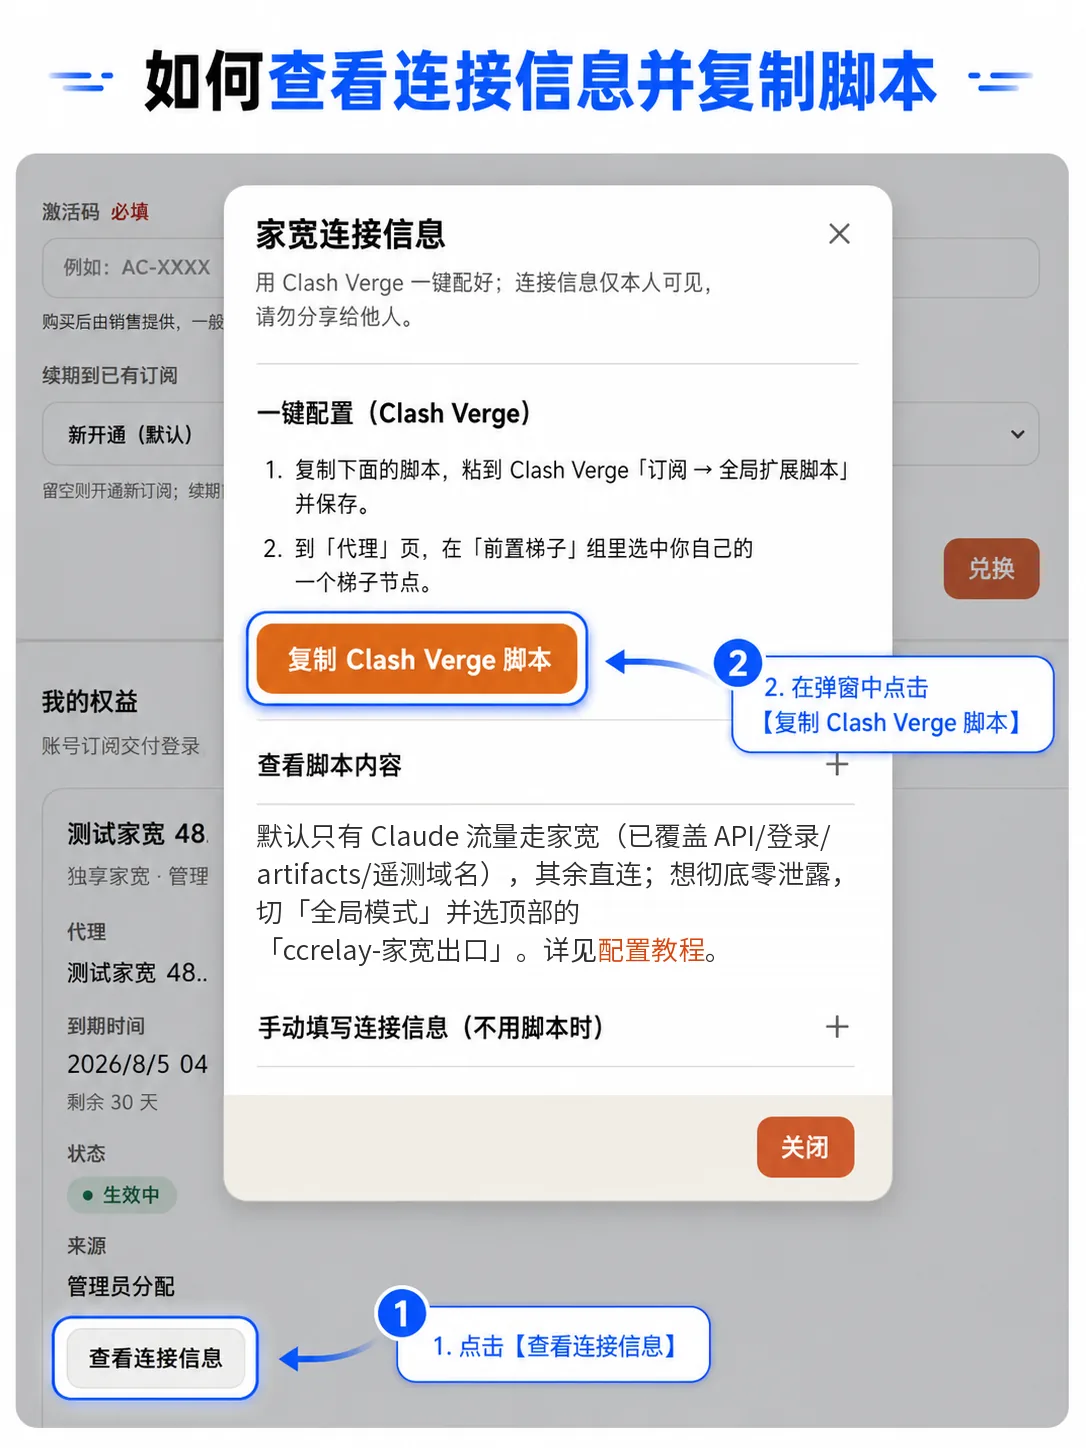
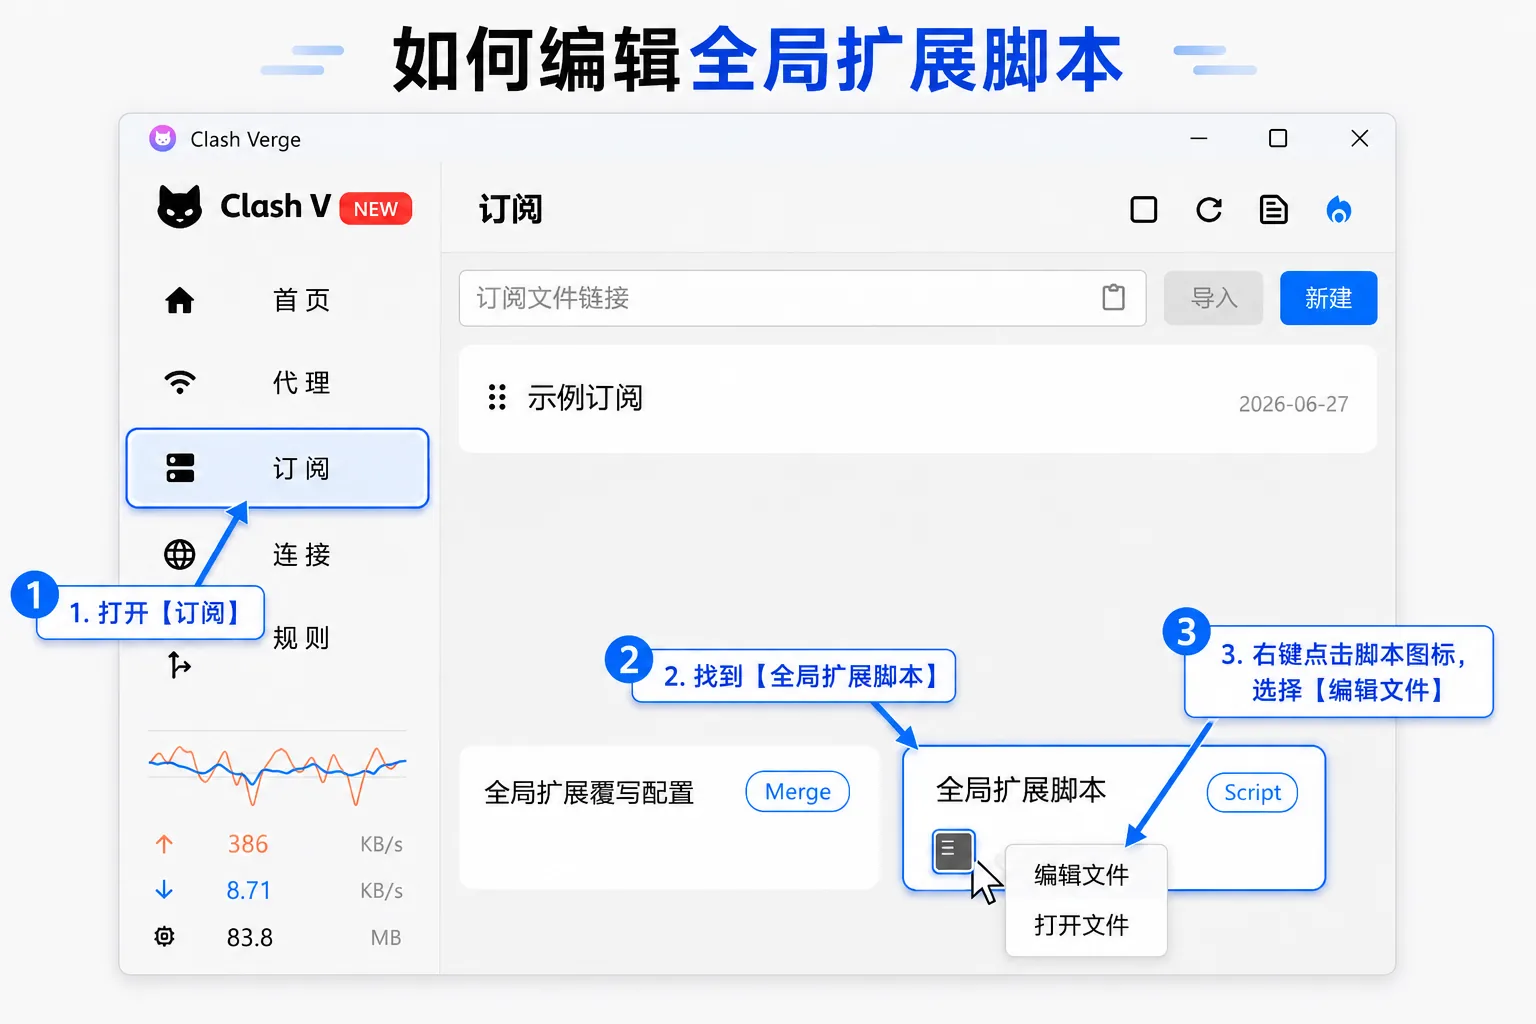
Script, Global Extend Script (全局扩展脚本) → right-click the script icon → Edit File (编辑文件).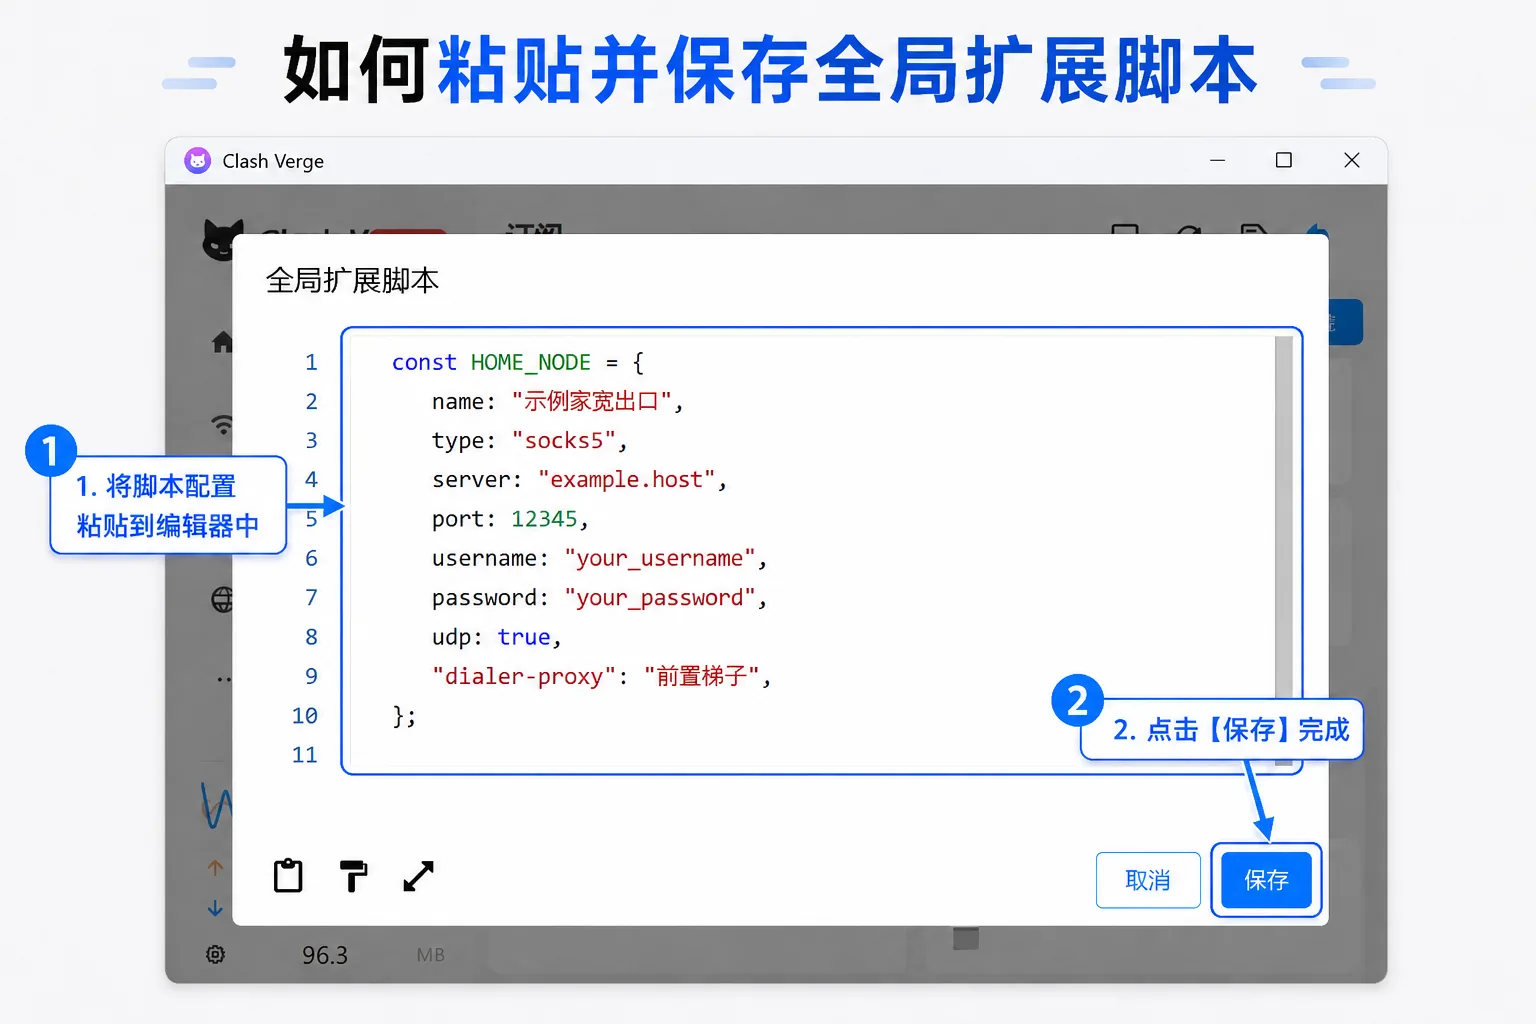
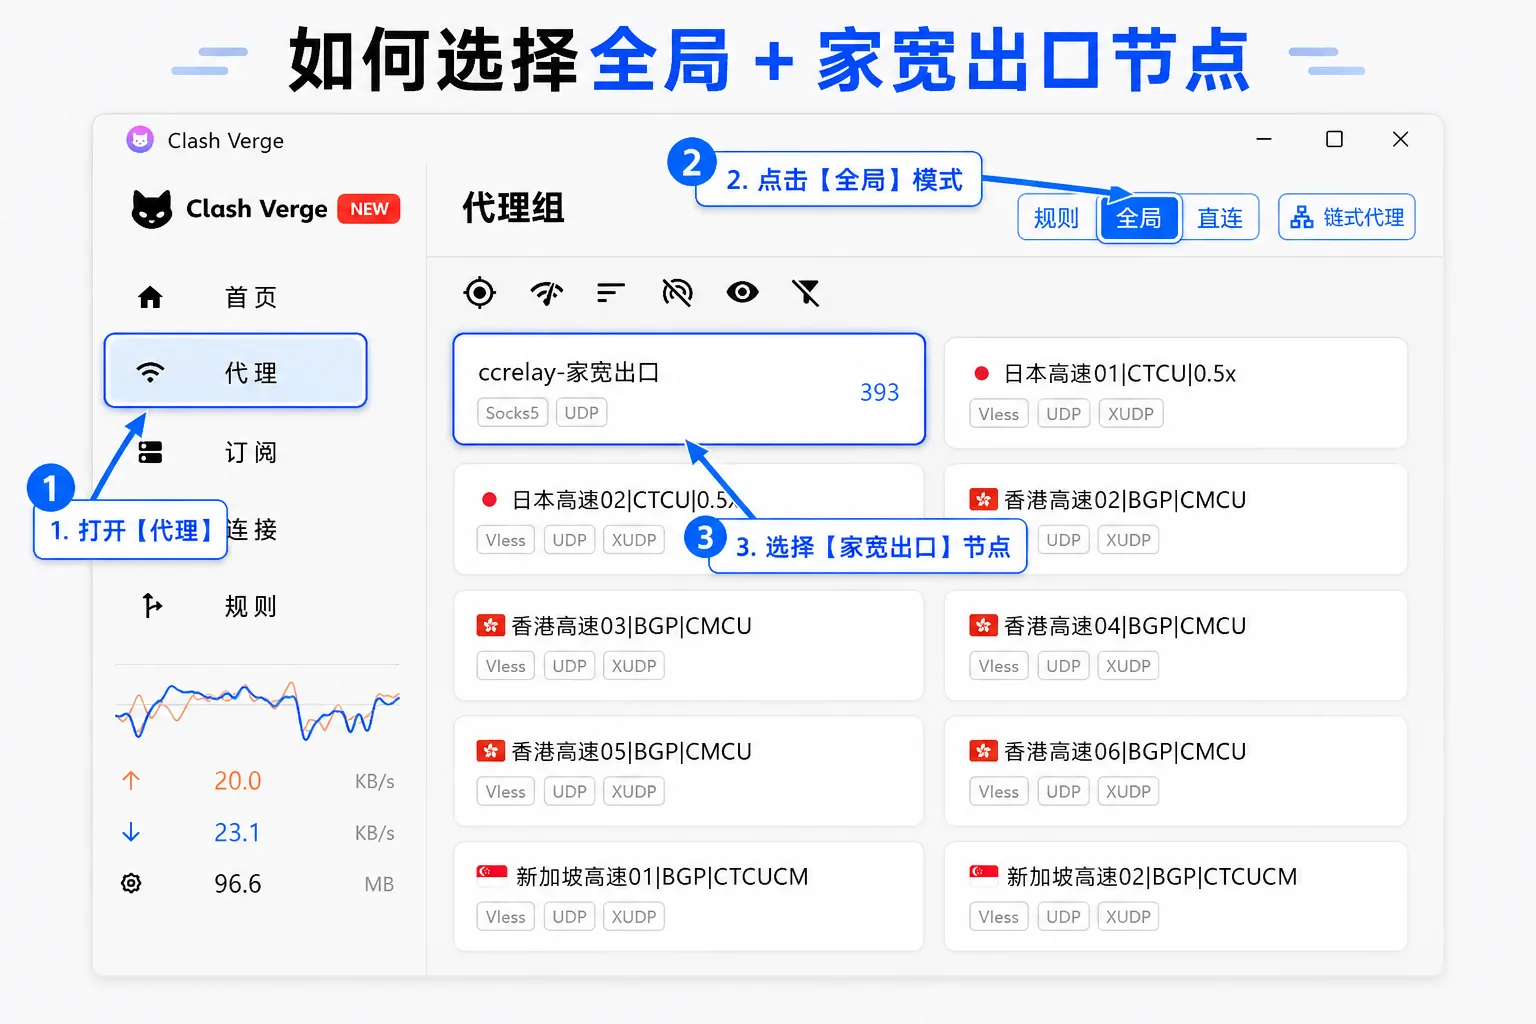
Whitelist-shaped: domestic and LAN traffic stays direct and anything already named in your subscription is unchanged, while Claude's domains, the sign-in human check and the ipinfo.io / ifconfig.me self-check take the residential line — and so does anything not named at all. Newly added official domains leak nothing, and domestic traffic is unaffected.
Every last bit of traffic — domestic sites included — goes through the one residential exit you picked by hand. Compared with the default whitelist routing, all it adds is domestic traffic riding along. Usually unnecessary.
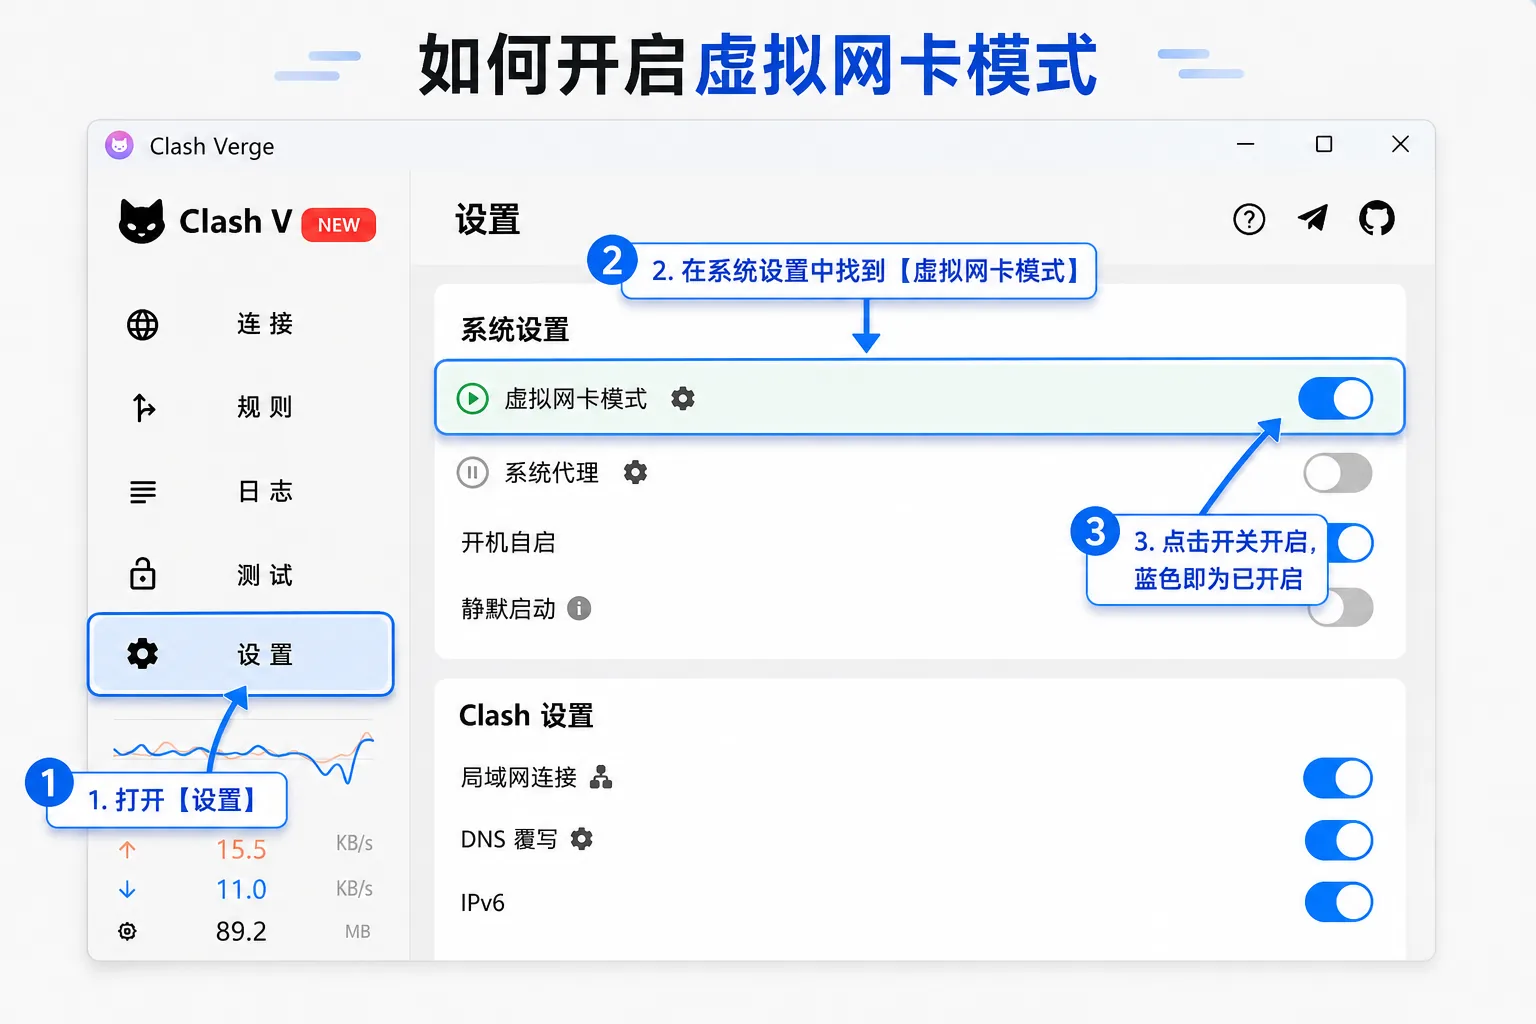
TUN drives a virtual network adapter and the system routing table, which takes elevated rights. Install the background system service once (Windows shows a UAC prompt) and from then on turning TUN on needs no administrator run, and the core keeps handling traffic after the GUI exits. Without the service, and without running as administrator, TUN either fails to start or keeps asking for rights.
It will, if you edit the subscription YAML directly — the next update replaces it. Put the chain into the Global Extend Script (全局扩展脚本) instead: it is re-applied after every subscription update. The neighbouring card, Global Extend Config (全局扩展覆写配置, badged Merge), replaces lists wholesale in the current release and cannot append nodes, so the extend script is the one to use. The one-click script on the console's residential card is exactly this kind of script, which also avoids the parse failures that come from mistyping a node name.
Step 04 · Self-check
There is exactly one test: the public egress IP you look up equals your residential egress IP. First note the Host / IP (主机 / IP) line from the console under My subscription → Residential → View connection details (我的订阅 → 家宽 → 查看连接信息), then run the command below to look up the egress you are actually using. Two matching IPs and you are done. The one-click script already routes both self-check domains below through 「Claude家宽」 in Rule mode; if you still see your own original IP, go back to 3b and make sure the Global Extend Script (全局扩展脚本) really was pasted and saved.
One by one
Comparing the IPs is enough — you do not need to study the org, the ISP or the ASN. Matching the residential egress means it passed; not matching means the last hop is not the residential line, so go back to 3b, confirm the script was saved and that dialer-proxy sits on the residential node and points at 「中间节点」.
# Look up the current public egress IP and compare it with your residential egress IPcurl https://ipinfo.io# On PowerShell (works without curl):Invoke-RestMethod https://ipinfo.io# Just the IP: curl ifconfig.meLast step: open Claude. Once the browser and the command line agree on the same residential egress, go back to the console, open My subscription (我的订阅) and click Open Claude (打开 Claude); your dedicated usage environment opens in a new tab.
FAQ
Yes. The clean-up script removes local sign-in credentials, sessions and config only; sign in to Claude Code or the desktop app again and carry on. Session data that never synced is gone for good, though. Before it deletes anything the script lists what it actually detected on this machine — read that list and only then answer y.
Most often the residential node is in the wrong place: dialer-proxy belongs on the residential exit node (「ccrelay-家宽出口」 in the one-click script) and must point at 「中间节点」. Put it the other way round — on the upstream node — and your egress becomes a datacentre IP. The residential node is the one carrying dialer-proxy. Next, check that your own node subscription is imported and that at least one node connects: the 「中间节点」 group picks one automatically, but if none of your nodes work there is no upstream hop to pick. Finally, do not use a self-switching url-test / fallback group as the residential exit — the exit must be a select group pinned to the residential node.
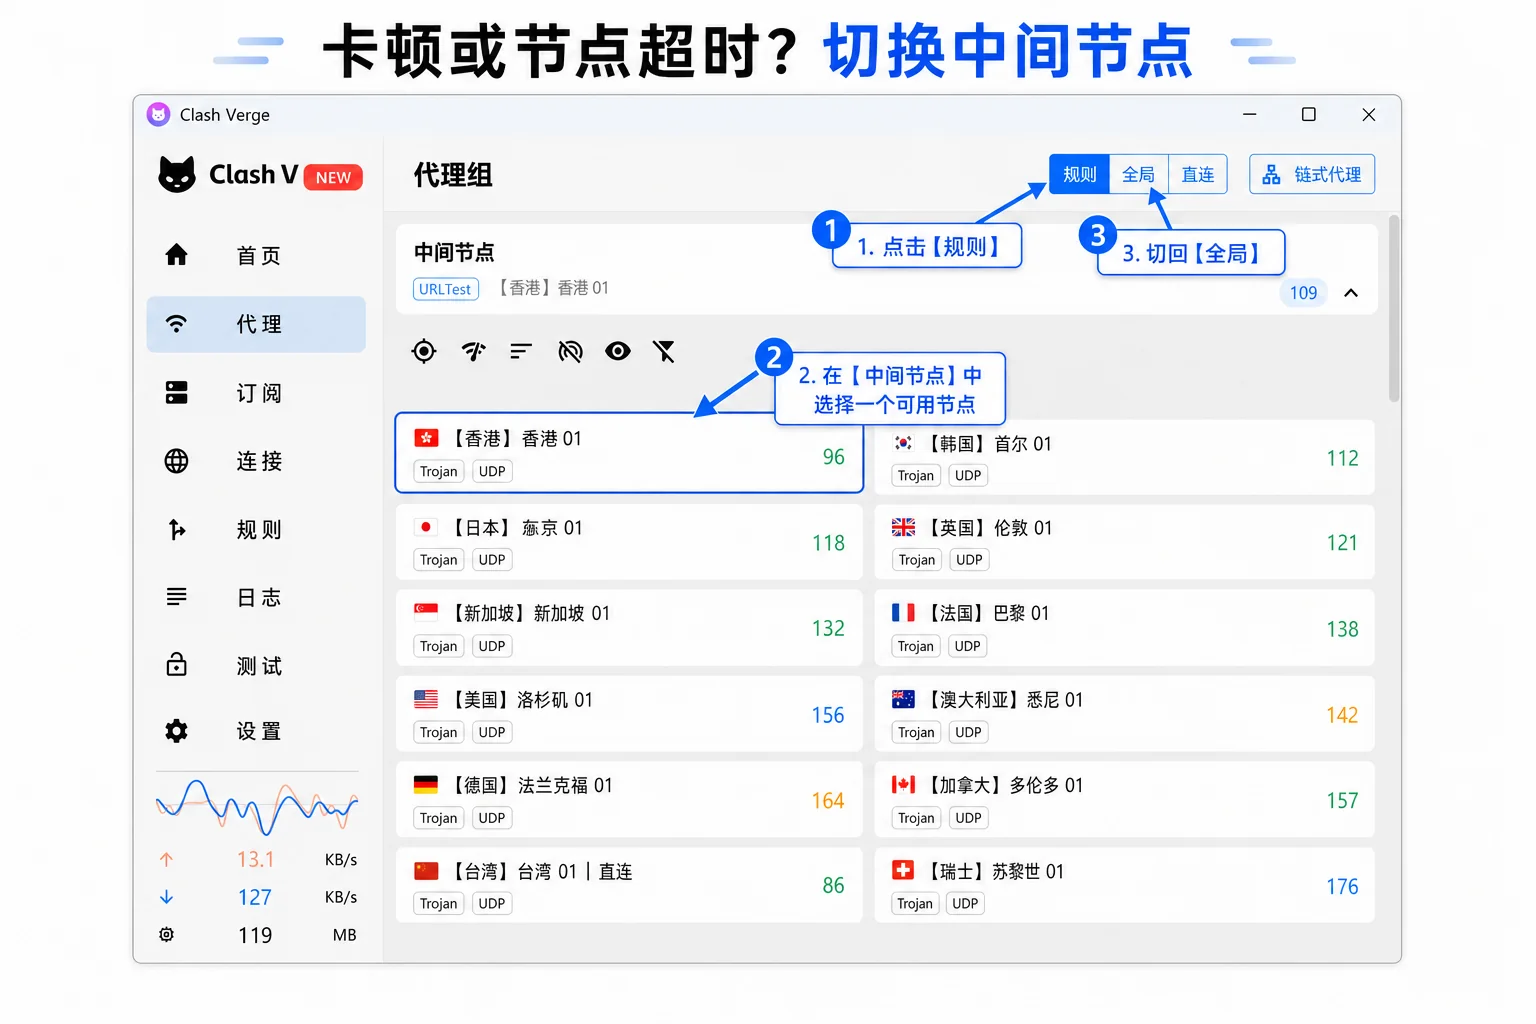
Change the upstream node first. The chain is 「中间节点」 → residential exit, and slowness or timeouts almost always come from that middle hop: the group is a url-test one and picks the lowest latency by default, but the node it landed on may be congested or dead. Switch by hand. If you are sitting in Global mode, the Proxies page shows only the GLOBAL group and 「中间节点」 is hidden, so switch to Rule (规则) to reveal the groups, pick a node with a low latency number, and switch back to Global (全局) if you need to — on the default Rule mode, steps 1 and 3 are unnecessary. Then run the egress self-check again and confirm you still land on your residential egress IP.
No. TUN's job is to take over command-line traffic, UDP and the rest; once it has, you can still choose Rule or Global as the proxy mode, and Rule is fine. Rule mode is whitelist-shaped routing: domestic and LAN traffic stays direct, anything named in your subscription is unchanged, and everything else — all of Claude's domains including newly added official ones, the sign-in human check, the ipinfo.io / ifconfig.me self-check — goes through 「Claude家宽」, so nothing leaks. Global mode sends domestic traffic down the residential line as well, which is usually unnecessary. Either way, finish the egress self-check and confirm the browser and the command line report the same residential IP.
Sharing one Claude account between people is not advisable. The egress can be the same line, but the account should be one person per seat, with the signed-in state living on one clean device. Several people signed in to one account at once is a classic trigger for account controls.
The old relay proxy group was removed in newer mihomo builds — writing type: relay now fails at startup, so use dialer-proxy throughout. For a single node, point its dialer-proxy at the 「中间节点」 group. To put one upstream hop in front of every node in a subscription, use proxy-providers.override.dialer-proxy.
Usually the DNS configuration after TUN took over. Leave the tun and dns sections of the configuration at the core's defaults or at whatever sensible values your node subscription supplies, rather than deleting bits of them. If you do lose connectivity, turn TUN off first while you investigate and check that Service Mode installed correctly.